
In this article we will show you how to install and configure your first CA service across your domain environment. This step is essential if you want to encrypt SQL Server communications via SSL certificates (Until Microsoft SQL Server 2019).In the next article (Part 2) “How to issue SSL certificate and configure Microsoft SQL Server to use issued SSL certificate” we will show you how to create SQL Server SSL template and issuing required SSL certificates for Stand-alone and Clustered SQL Server Instance(s).
Step 1: Perquisites
Preferred to installing the root CA on a stand-alone server ensures no issues with domain communication when the VM is booted at a later date.
Step 2: Installing Certificate Services
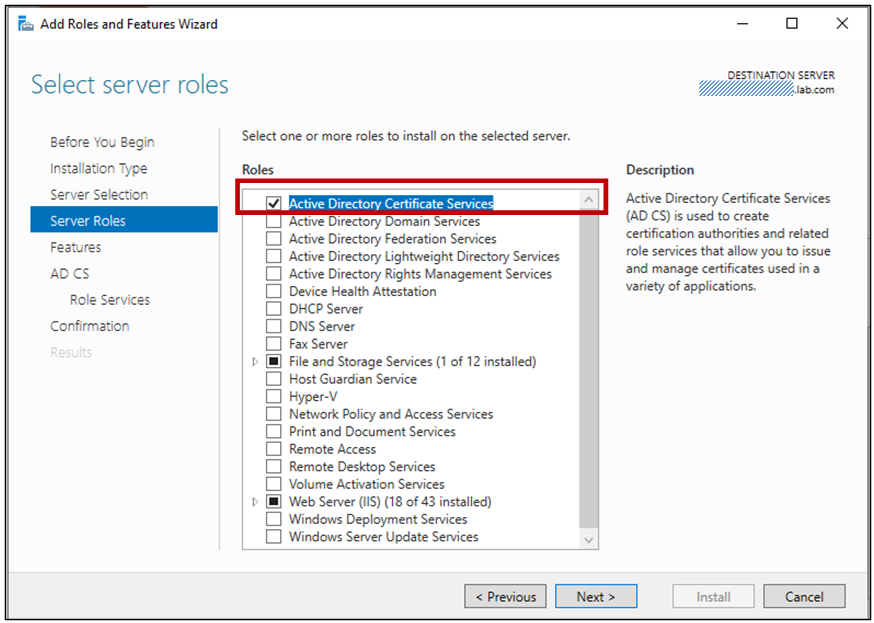
Deploying Certificate Services on Windows Server 2012 R2+ is simple enough, open Server Manager, open the Add Roles and Features wizard and choose “Active Directory Certificate Services” under Server Roles.
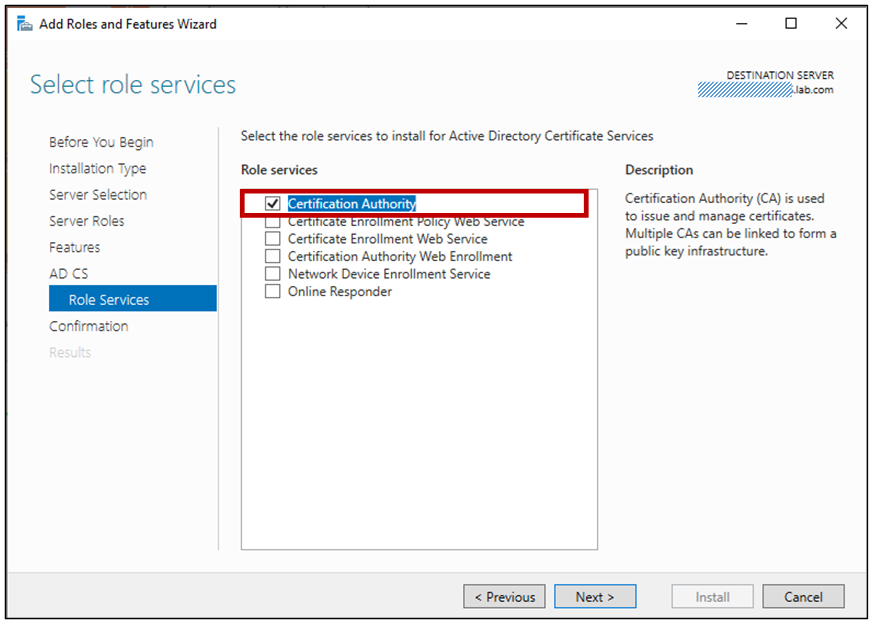
Ensure you choose only the Certificate Authority role for the Root CA.
Also, you can do same via below PowerShell command:
Add-WindowsFeature -Name ADCS-Cert-Authority -IncludeManagementTools
Step 3: Configuring Certificate Services
After Certificate Services is installed, start the configuration wizard from Server Manager:

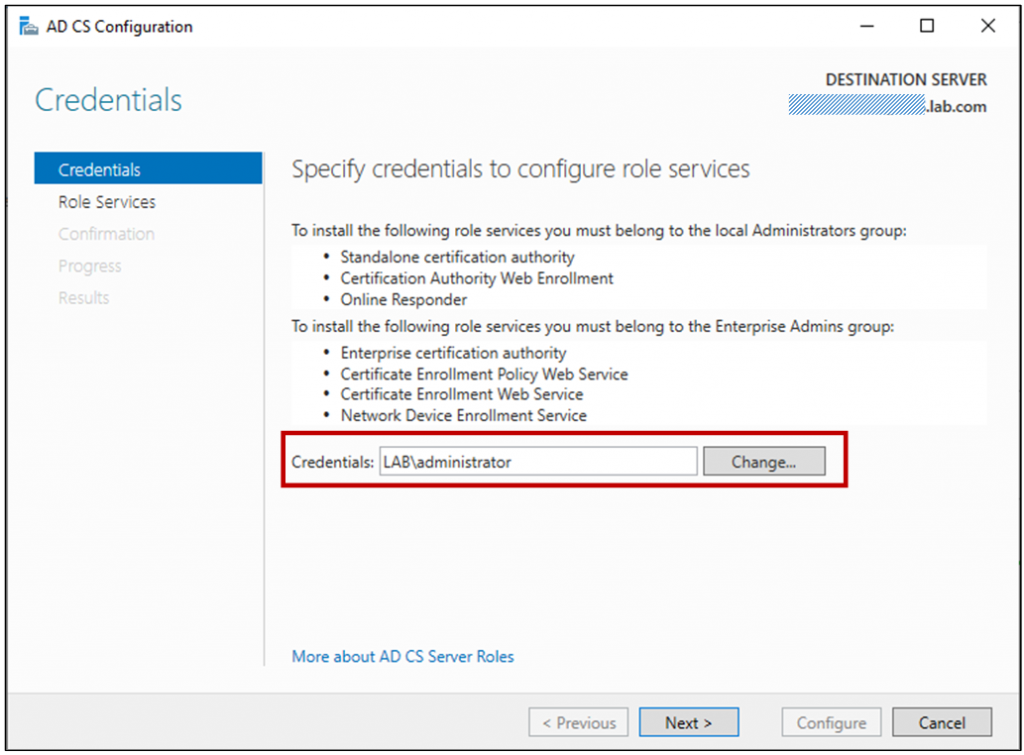
Set the credentials to be used while configuring Certificate Services. It’s preferred to using a DC admin account (Example: Lab\Administrator)
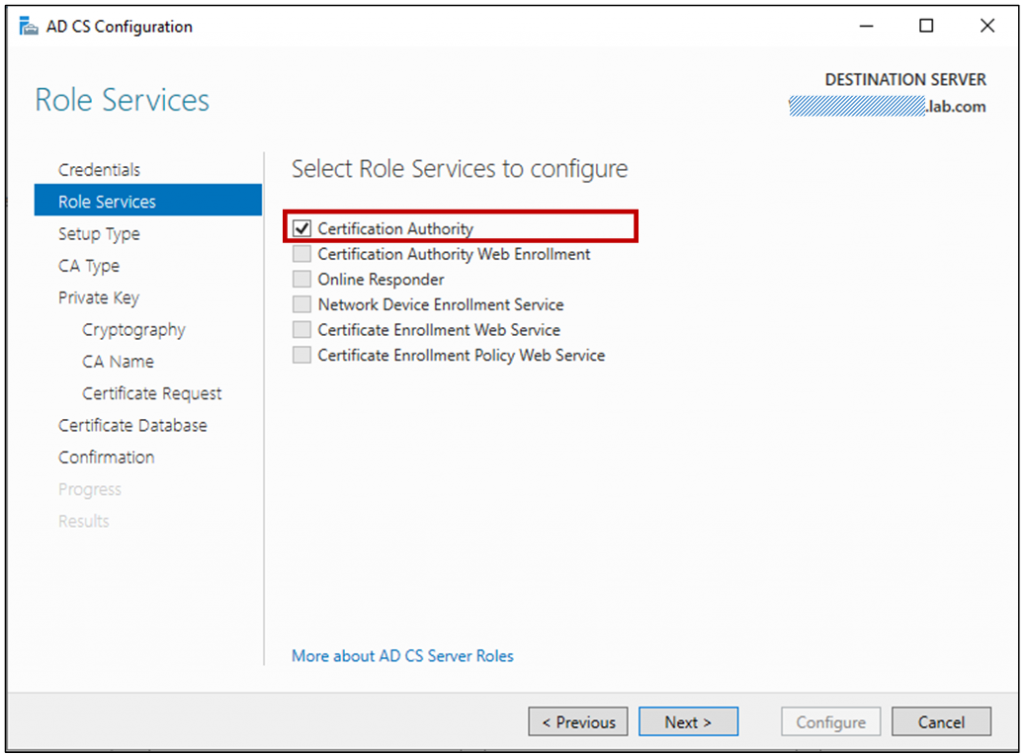
For the Root CA, we have only one role to configure “Certification Authority”.
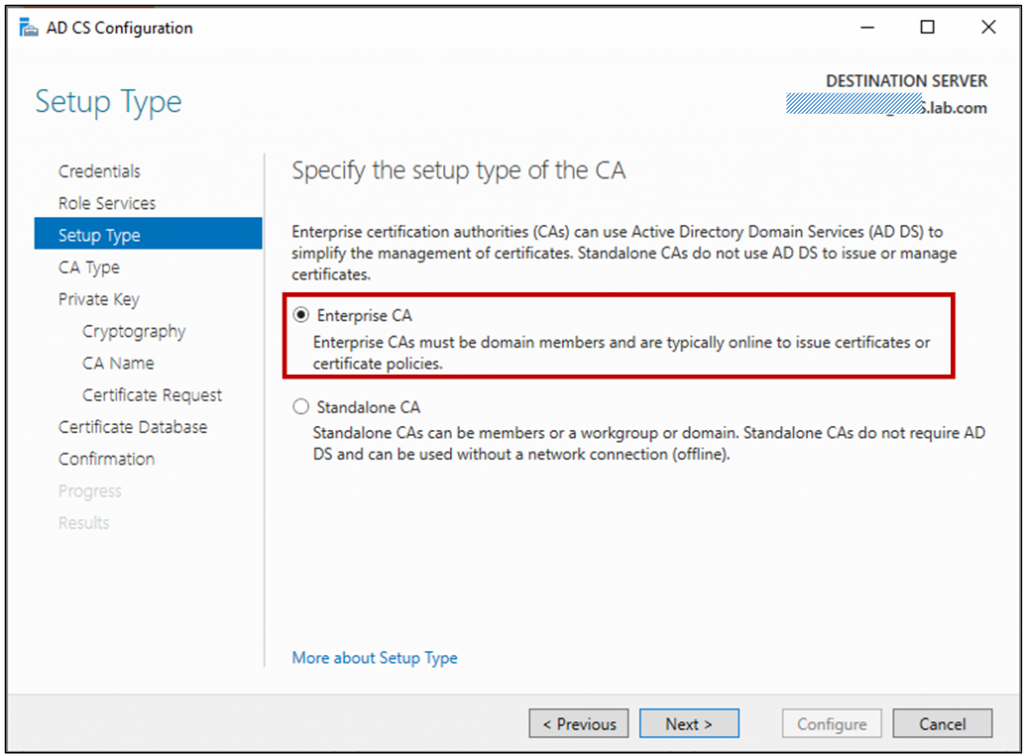
This certificate authority is being configured on an Enterprise as member of Active Directory, so we configure it as Enterprise CA.
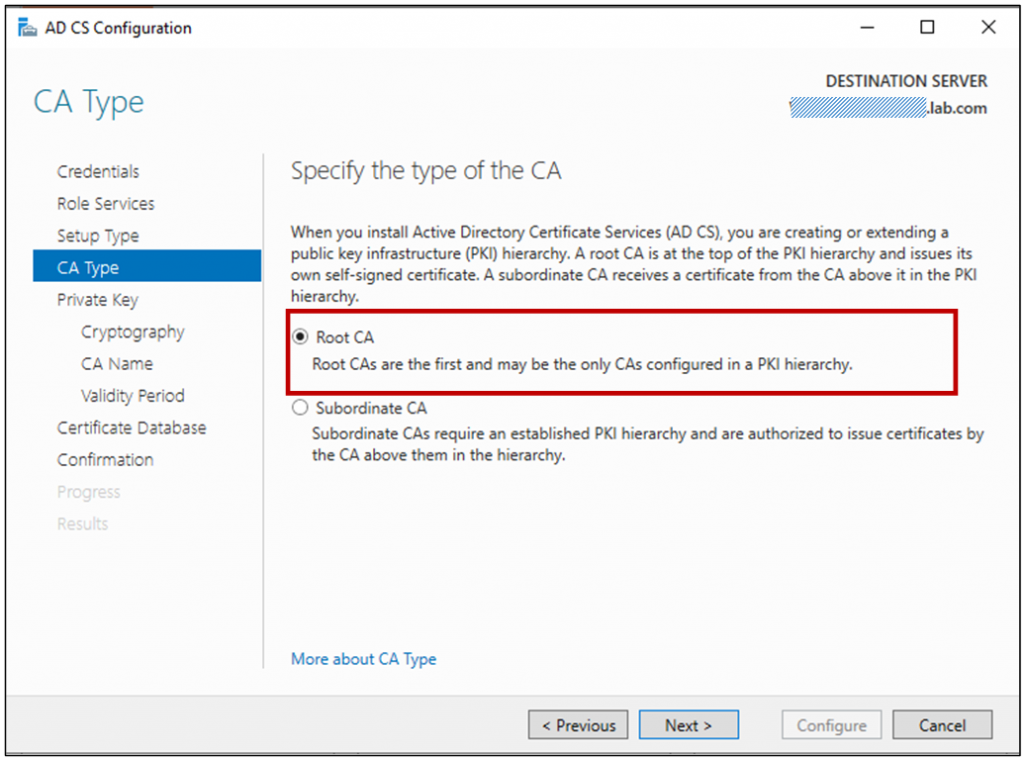
This is the first CA in our environment, so be sure to configure this as a root CA.
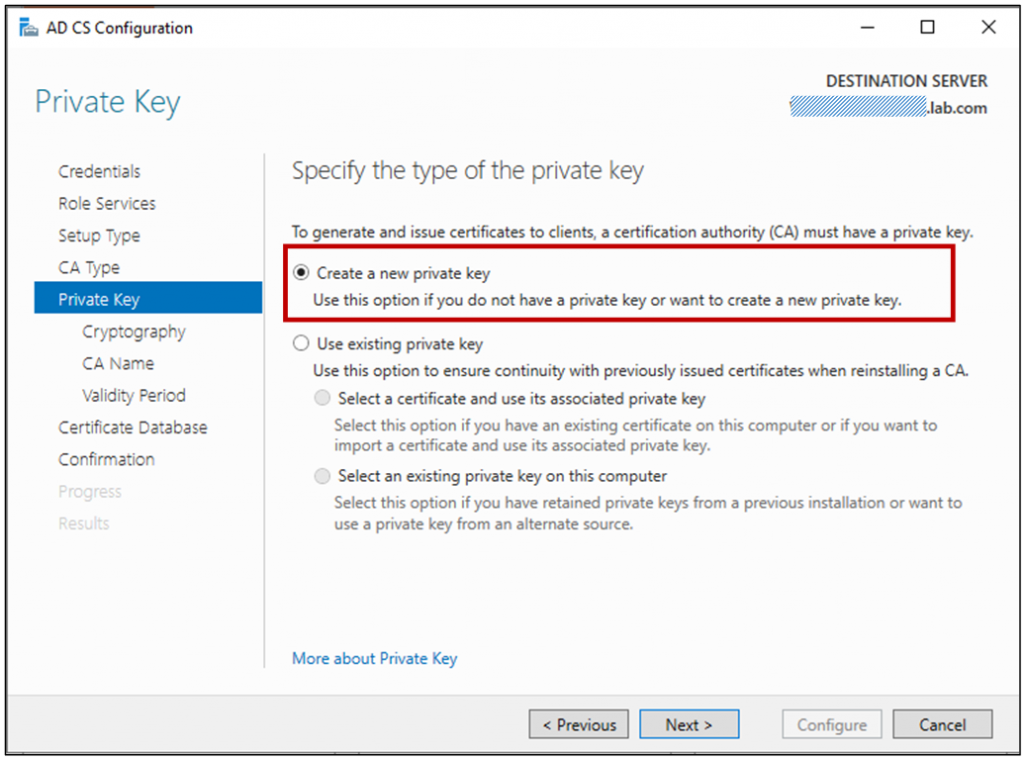
With the first CA in the environment, we’ll won’t have an existing private key, so must choose to create a new one.
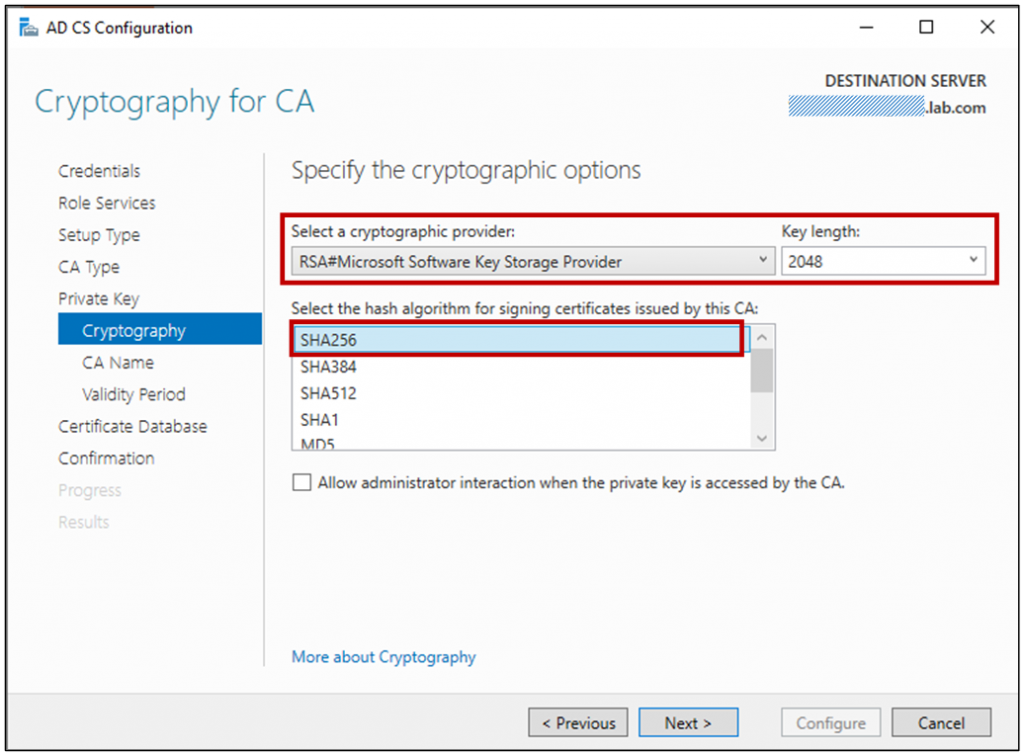
When selecting a cryptographic provider and a hash algorithm, SHA1 will be the default hashing algorithm; however, Windows will no longer accept certificates signed with SHA1 after 1st of January 2017, so be sure to choose at least SHA256.
Specify a common name for the new certificate authority. I’d recommend keeping this simple using the ANSI character set, using a meaningful name (Example: LAB-CA)
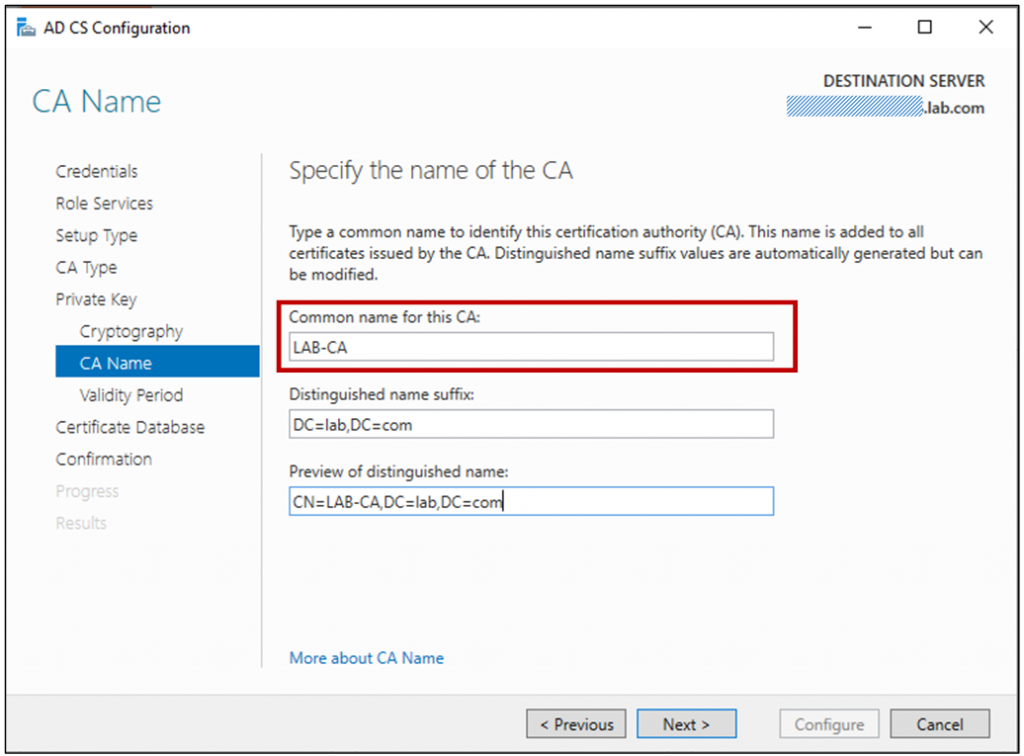
Select the validity period – perhaps the default is the best to choose; however, this can be customized based on your requirements. This is a topic that is a whole security conversation in itself; however, renewing CA certificates isn’t something that you want to be doing too often. Considerations for setting the validity period should include business risk, the size and complexity of the environment you are installing the PKI into, and how mature the IT organization is. (Example: 15 Years)

On the next page of the wizard, you can choose the location of the certificate services database and logs location (C:\Windows\System32\Certlog), which can be changed depending on your specific environment.

On the last page, you will see a summary of the configuration before committing it to the local certificate services.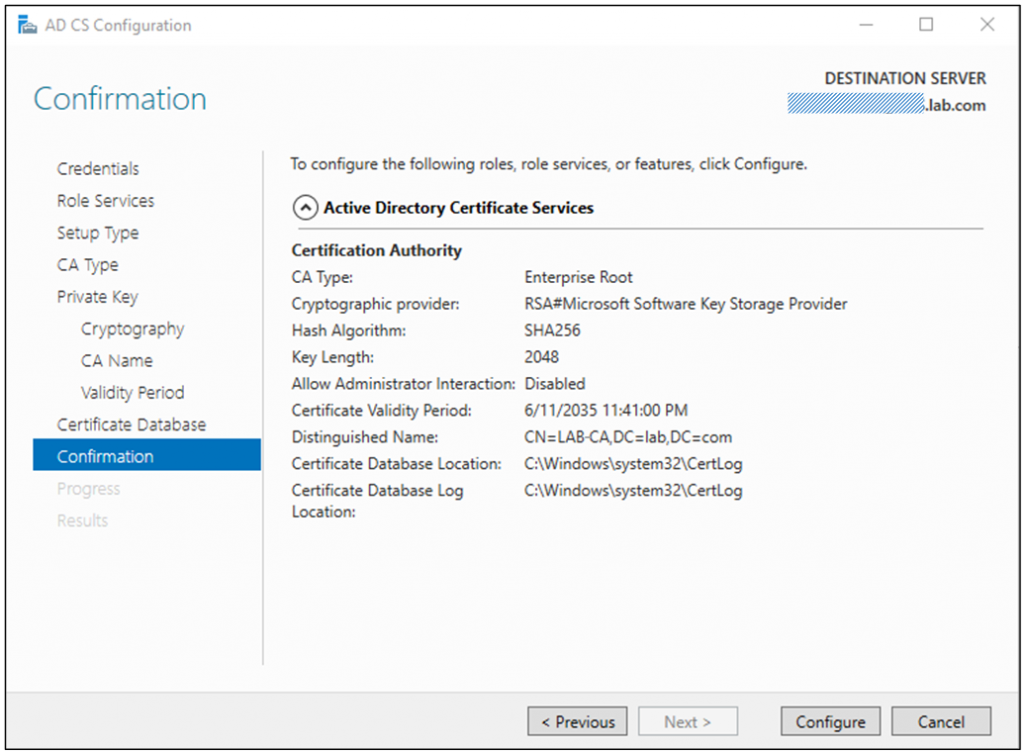

Step 4: Configuring the Root CA
Now that certificate services have been installed and the base configuration is complete, a set of specific configuration changes is required to ensure that an offline Root CA will work for us.
Now open the “Windows Administration Tools” -> “Certificate Authority” management console, and view the properties of the certificate authority and the Root CA’s certificate:


Step 5: Setting the Issued Certificate Validity Period
The default validity period for certificates issued by this CA will be 1 year. we can use to define the validity period for issued certificates. So, we need to set this in the registry.
We should set the validity period on the root CA before we issue any certificates.
To change the validity period, open Registry Editor and navigate to the following key:
HKLM\SYSTEM\CurrentControlSet\Services\CertSvc\Configuration\<certification authority name>
In my lab, this path is:
HKLM\SYSTEM\CurrentControlSet\Services\CertSvc\Configuration\LAB-CA
Here I can see two values that define how long issued certificates are valid for – ValidityPeriod (defaults to 1) and ValidityPeriodUnits (defaults to “Years”).
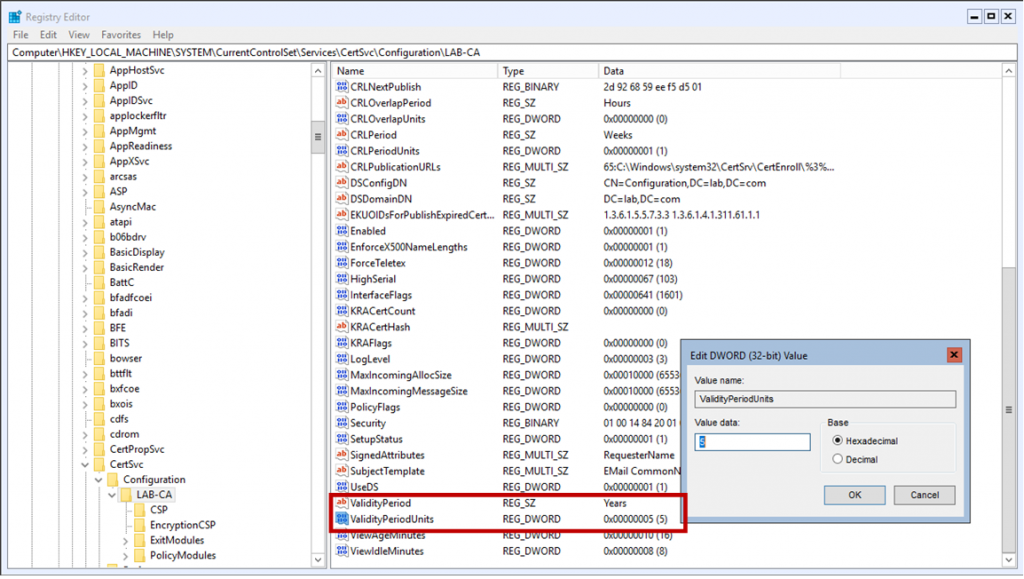
Open ValidityPeriodUnits and change this to the desired value. My recommendation would be to make this 1/2 the lifetime of Root CA’s certificate validity period, so if you’ve configured the Root CA for 10 years, set this to 5 years. You’ll need to restart the Certificate Authority service for this to take effect.
An alternative to editing the registry directly is to set this value to certutil.exe. To change the validity period to 5 years run below command:
C:\certutil -setreg ca\ValidityPeriodUnits "5"
Step 6: Preparation of Group Policy Management
To exporting root CA:
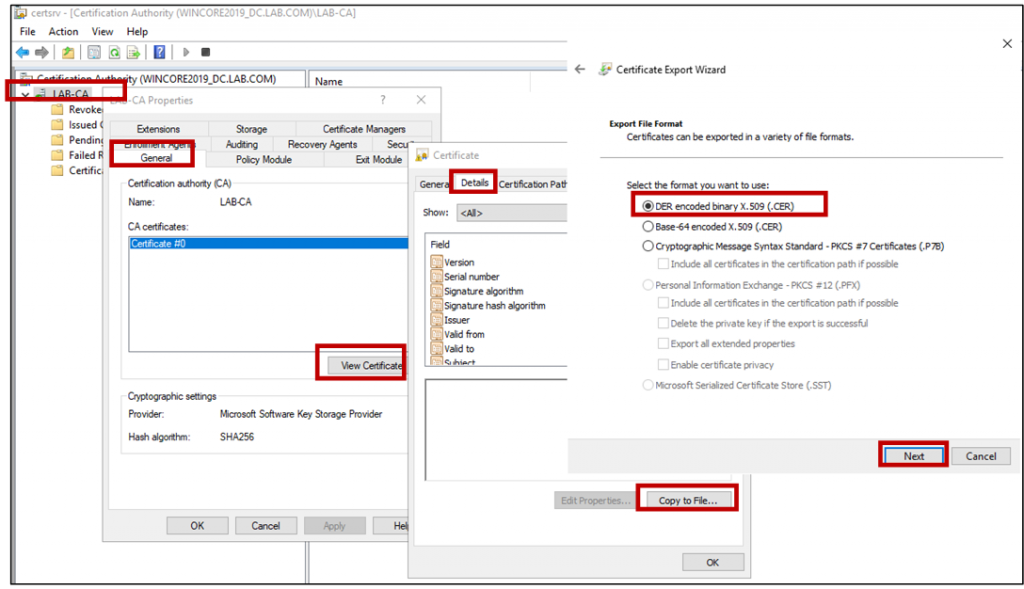
- In the CA server, launch the Certificate Authority application by Start | Run | certsrv.msc.
- Right click the CA ROOT node and select Properties.
- On the General tab, click View Certificate button.
- On the Details tab, select Copy to File.
- Follow through the wizard, and select the DER Encoded binary X.509 (.cer) format.
- Click browse and specify a path and filename to save the certificate (Example: LAB-CA.cer).
- Click Next button and click Finish.
To manage trusted root certificates for a domain:
- Open Server Manager, and under Features Summary, click Add Features. Select the Group Policy Management check box, click Next, and then click Install.
- After the Installation Results page shows that the installation of the Group Policy Management Console (GPMC) was successful, click Close.
- Click Start, point to Administrative Tools, and then click Group Policy Management.
- In the console tree, double-click Group Policy Objects in the forest and domain containing the Default Domain Policy GPO that you want to edit.
- Right-click the Default Domain Policy GPO, and then click Edit.
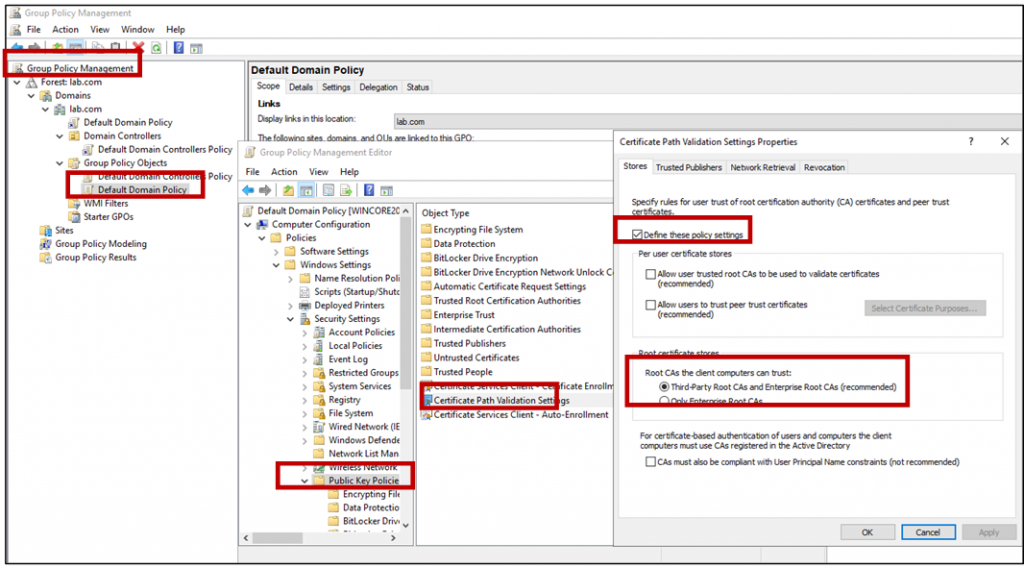
- In the GPMC, go to Computer Configuration, Policies, Windows Settings, Security Settings, and then click Public Key Policies.
- Double-click Certificate Path Validation Settings, and then click the Stores tab.
- Select the Define these policy settings check box.
- Under Per user certificate stores, clear the Allow user trusted root CAs to be used to validate certificates and Allow users to trust peer trust certificates option in the Per User Certificate Stores check boxes.
- Under Root certificate stores, select the root CAs that the client computers can trust (In our scenario we select Third-Party CA and …), and then click OK to apply the new settings.
To Adding certificates to the Trusted Root Certification Authorities store for a domain:
- Domain Admins is the minimum group membership required to complete this procedure.
- To add certificates to the Trusted Root Certification Authorities store for a domain
- Open Server Manager, and under Features Summary, click Add Features. Select the Group Policy Management check box, click Next, and then click Install.
- After the Installation Results page shows that the installation of the GPMC was successful, click Close.
- Click Start, point to Administrative Tools, and then click Group Policy Management.
- In the console tree, double-click Group Policy Objects in the forest and domain containing the Default Domain Policy GPO that you want to edit.
- Right-click the Default Domain Policy GPO, and then click Edit.
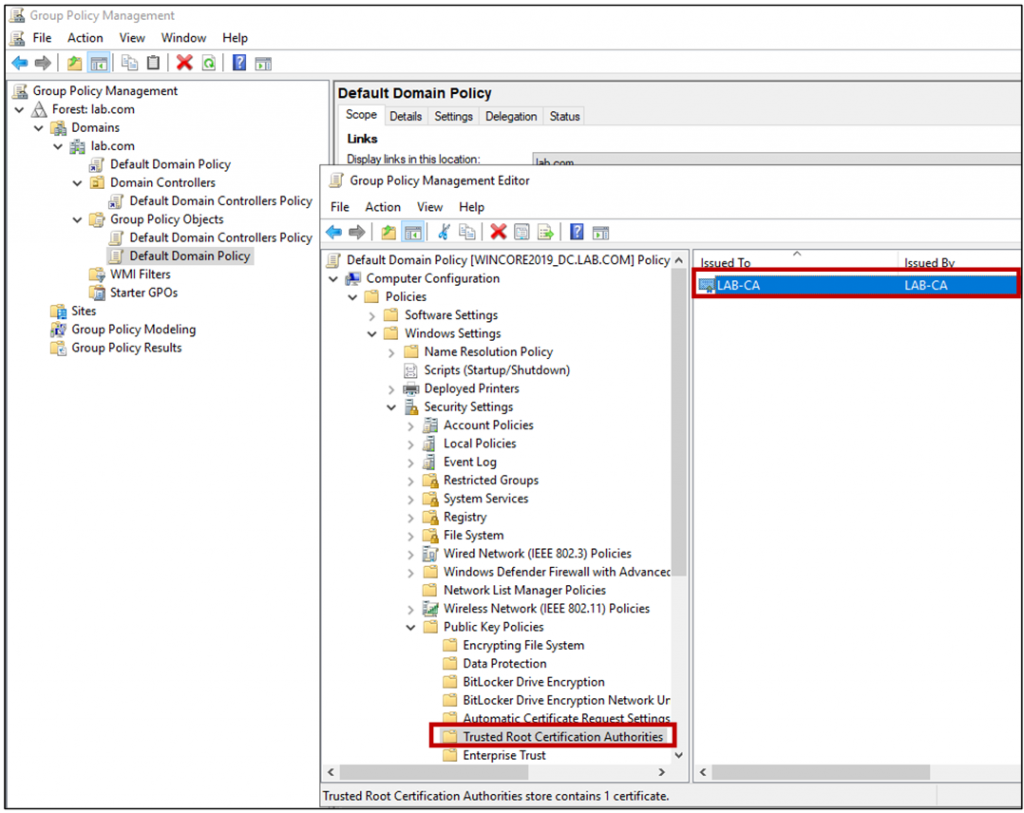
- In the GPMC, go to Computer Configuration, Policies, Windows Settings, Security Settings, and then click Public Key Policies.
- Right-click the Trusted Root Certification Authorities store.
- Click Import and follow the steps in the Certificate Import Wizard to import the certificates (You should import the .cer file that exported previously in “To exporting root CA” phase of Step 6. Example: LAB-CA.cer).
To Configuring the trusted publisher’s policy settings for a domain:
- Click Start, point to Administrative Tools, and click Server Manager.
- Under Features Summary, click Add Features. Select the Group Policy Management check box, click Next, and then click Install.
- After the Installation Results page shows that the installation of the Group Policy Management Console (GPMC) was successful, click Close.
- Click Start, point to Administrative Tools, and then click Group Policy Management.
- In the console tree, double-click Group Policy Objects in the forest and domain containing the Default Domain Policy Group Policy object (GPO) that you want to edit.
- Right-click the Default Domain Policy GPO, and then click Edit.
- In the console tree under Computer Configuration\Policies\Windows Settings\Security Settings, click Public Key Policies.
- Double-click Certificate Path Validation Settings, and then click the Trusted Publishers tab.
- Select the Define these policy settings check box, select the policy settings that you want to apply, and then click OK to apply the new settings.

Now you finished installation and configuration of your first CA server across your domain environment. In the next article “How to issue SSL certificate and configure Microsoft SQL Server to use issued SSL certificate” we will show you how to configure SSL certificate for SQL Server communications.
Database administration is an exciting job combining knowledge, art and experience; you must live with it to love it, despite all the difficulties.
Currently I'm working as a Microsoft SQL Server DBA and BI consultant.

I make SQL Server faster and more reliable. Database administration isn’t about passing a certified exam or about pointing and clicking your way through a crisis. Database administration is about applying the right solution at the right time, avoiding risk, and making robust choices that get you home each night in time for dinner with your family.
[…] How to install and configure Microsoft Certification Authority (CA) Services […]